
K and I recently bought an investment property to house hack. This is the 7th post of a new series on strategy and tactics for how to house hack in an expensive market, using our own example as a case study.
Last time, I showed you how I find and vet good contractors and how I minimize rental vacancies (even before closing a new rental property transaction).
Those posts talked about the most important things to do while still in escrow. And they showed my step-by-step process for finding and vetting contractors effectively.
Once you’ve hired contractors, though, how do you actually make sure your project gets done the right way: smooth, effective, and cost-efficient?
In this post, I’ll share best practices we learned from remodeling our 4-plex. For example, our approach, specific choices we made, and how we prioritized stuff. There are also some neat strategies we learned to save time and money.
Hopefully this helps you complete your own project even more effectively and cost-efficiently.
Why we decided to remodel (and our results)
When we bought our place, we knew we’d have to upgrade stuff. The bones of the house were good: new PEX pipes, sturdy roof, good efficient floor plans, solid foundation. Also, location was superb (most important).
But! All the interiors and fixtures were old. Some as old as the house. Rents were lagging. By $800 – $1,300. Per unit. Per month. Every month.
We knew rents could be raised overnight. We didn’t know by how much. But we were pretty sure we couldn’t get them up to market levels without significantly upgrading stuff. To turn around the property financially, we knew we’d have to put in some sweat and dollars upfront to remodel things.
Also, we wanted to do our best to attract high quality renters. You know, ones with stable jobs who are clean, quiet, and considerate. And, of course, we wanted to be proud of the product we were offering to renters. Quality is important to us.
I’ll talk about the details in a sec, but to skip straight to the end first, with most of our remodeling now finished, our rents are now at market levels. The building earns 1.6x what it earned before. Win. The units are way more handsome now, too. And our tenants are great. Hopefully they’ll want to stay a long time.
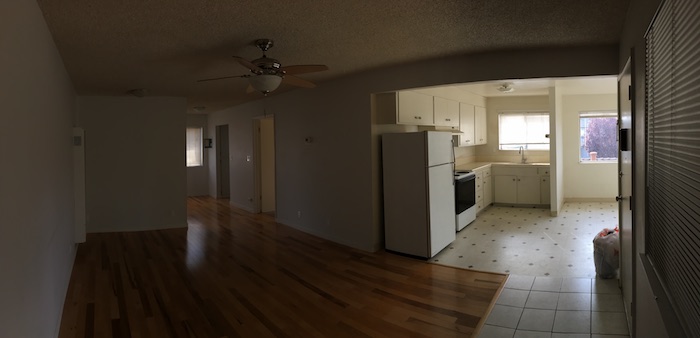
What things looked like BEFORE remodeling
You might be curious, so here are some photos before our remodel….
First unit:

Second unit:
Third unit:

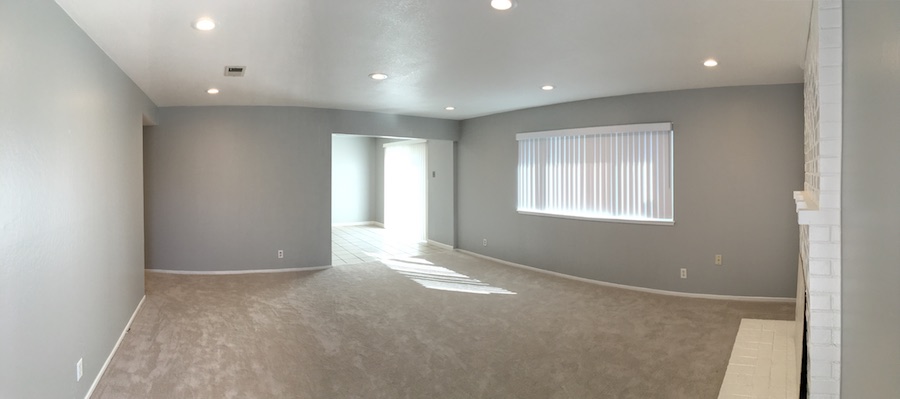
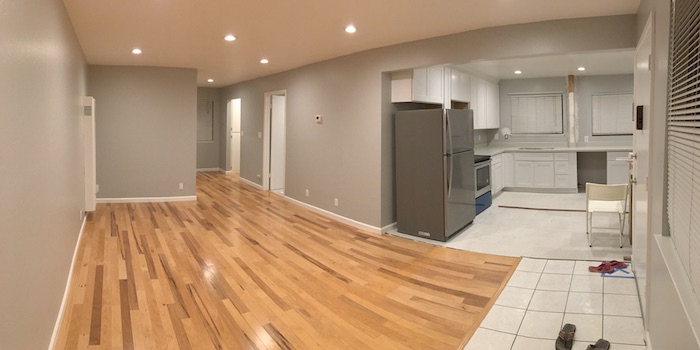
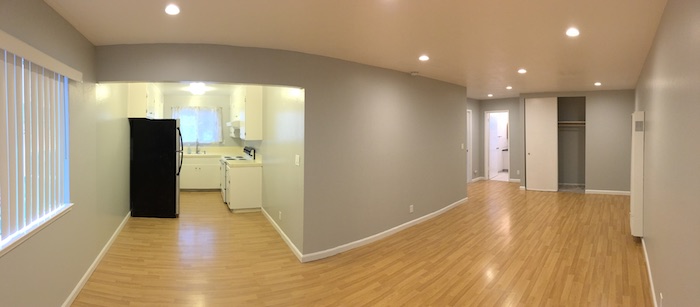
What things looked like AFTER remodeling
…and after.
First unit:
Second unit:
Third unit:
Why we chose specific renovations and how we prioritized stuff
The “how we prioritized stuff” part is easy: we did it entirely based on bang for buck. If you read my earlier post on how to minimize rental vacancy, I talked there about our method for figuring out which remodeling tasks have the highest value to tenants yet lowest cost. We followed that method rigorously.
But let’s say you don’t care for the details and just want a mental shortcut. Well, I can tell you the stuff most valuable to tenants are usually going to be: kitchen, bath, flooring, paint. (Probably in that order.)
Surprise, surprise – that’s what we focused on in our 4-plex remodel.
All four units had mucus colored landlordy paint. The carpets were dingy. Two units had passable kitchens, the other two crappy ones needing complete overhauls. Two units had passable bathrooms, two had crappy ones needing complete gutting.
We focused on upgrading kitchens and baths where they were most sorely needed. We did more cosmetic upgrades elsewhere. We put in new carpet. Repainted. Took care of low-hanging fruit.
We scraped off old popcorn ceiling (surprisingly expensive when permits and certified remover are required). Took down old light fixtures, replaced them with sleek recessed lights.
In remodeling, our main criteria was, we had to be willing to live there ourselves. If we weren’t willing, then we couldn’t expect anyone like us to be willing to rent there either, right?
Tips for remodeling effectively
Here are a few lessons we learned along the way.
1. Sequencing. It’s best to sequence/schedule your contractors to work in the optimal order. You don’t want later contractors to “undo” the work of earlier contractors.
In general, I recommend remodeling from the ceiling downward. That way your flooring guy, for example, only has to clean fallen debris once. For the 4-plex, we scraped off old popcorn ceiling, drilled holes for recessed lights, and painted top to bottom. Our carpet guy only had to deal with junk on the floor once.
The point is, think about dependencies your contractors have on each other and sequence their work to minimize rework. To help visualize things, I recommend creating a daily tracker and review it constantly to move things around as needed.
Here is what mine looks like:
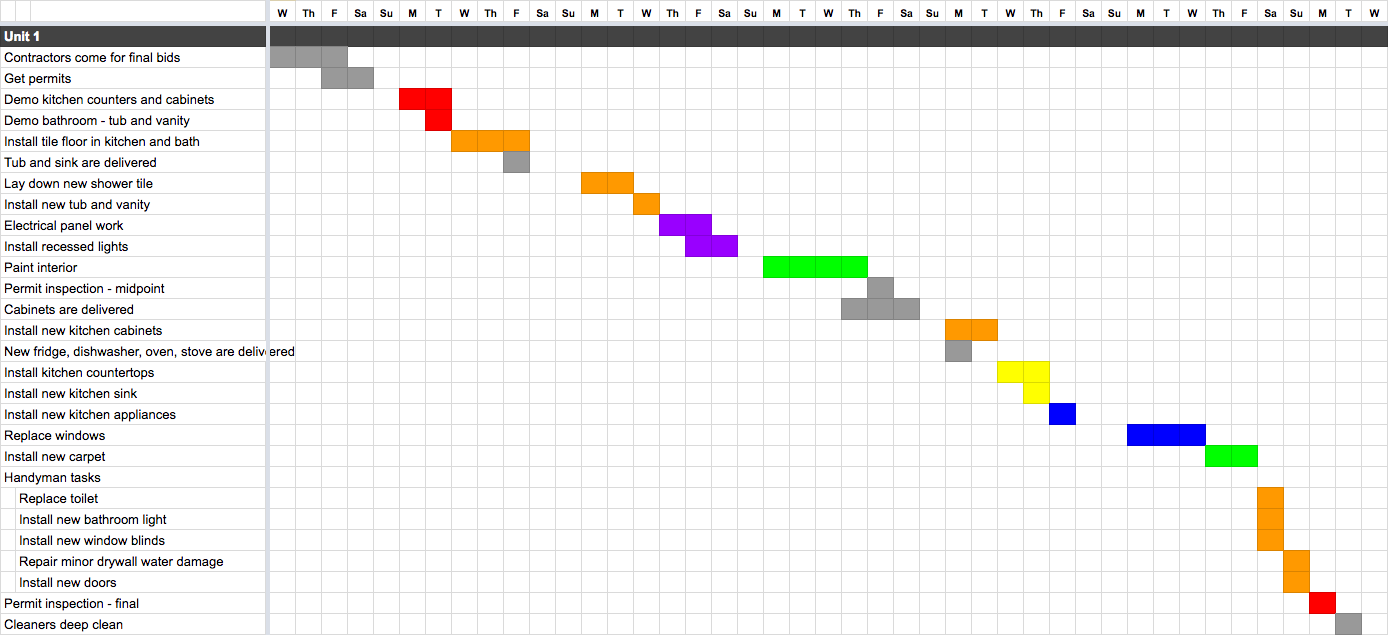
Using this kind of timeline will help you stay clear on actions you need to take each day to keep moving the ball forward.
2. Communications. Stay in constant communication with your contractors. Even if they don’t check in with you, check in with them. At least once a day. This will keep you on track.
Because, sometimes they finish early. Sometimes they finish late. If you aren’t nudging regular updates from them on progress and status, it can lead to unpleasant surprises later.
For example, you expected your next contractor to start work, only to find out the guy before isn’t finished yet. Or the guy before finished two days early, and you could have saved those two days had you known and rescheduled the next contractor.
It’s on you to proactively check in with your contractors each day. Why is it on you, not them? Because when problems arise, they often don’t tell you until days later. Maybe they didn’t think it was a big deal. But if you had learned of it immediately, you could have addressed it early.
The point is, staying on top of your contractors even when they don’t check in with you is crucial: steady information flow lets you adjust schedules and course-correct quickly.
3. Being physically present. Do you have to be physically present to monitor the work? Well, no. But the fact of the matter is, if you have any flexibility to work from home, it’s extremely helpful to be present. It lets you check in throughout the day and provide feedback immediately.
Even if you can’t physically be there, at least check progress every night when you get home. If there’s a problem, it’s much easier to correct when only a day has passed vs. several days.
What if you’re remote / out of town? If you’re more than one hour away, you should probably just hire a general contractor or project manager. It’ll cost more, but it’s probably worth it if you’re long-distance.
Ask them to send you a daily progress video (or every couple days). If they’re unwilling or unreliable, ask a local friend to do it. Getting continuous “visual” updates really helps you stay informed and fix problems before they become costly.
Tips for saving money (a lot of it)

Here are useful tips we learned on how to save money, sometimes a lot, while remodeling.
1. Get free coupons. When you remodel, you’re going to visit the big box stores like Home Depot and Lowe’s. A lot. Sometimes half a dozen times a day. No joke! You’ll buy a ton of stuff there.
Did you know you can often get valuable coupons for the big box stores just by changing your address? It costs $1 to do it. You can do it at the post office. Or online. You can do it an unlimited number of times. If you moved from 123 Cherry Street to 456 Apple Street, you can request that same address change over and over again.
When you change your address, you’ll get a packet of coupons. Usually one of them will be for the big box stores. That makes sense, since moving to a new place often means doing remodeling / repairs around the same time. Where I live, the coupon is 10% off any order at Lowe’s, either in store or online. I also got a couple 10% off Home Depot coupons, but not consistently. The Lowe’s ones were consistent.
We did this change of address hack many times. Pay $1, get 10% off an entire purchase (which can be multiple thousands of dollars). Some post offices even leave the coupon books on the public countertop, which means you could go in and pick up a stack of coupon books without even bothering to change your address. (Just saying.)
2. Go to Pro Services. While we’re talking about the big box stores, you should know both Lowe’s and Home Depot have special customer service desks for pros/contractors. At Lowe’s they call it Pro Services. At Home Depot, it’s called Pro Services or Pro Xtra, I forget.
This special customer service desk isn’t advertised, but you’d know it if you were a contractor. It’s not limited to contractors, though. You can (and should) go there if you are doing any sizable remodel.
If you need to buy a lot of material, you can get some good discounts by purchasing from Pro Services. At my nearest Lowe’s, for example, the discounts apply once your basket total is $1,500 or more. The discounts vary by item and can go as high as 25% off. I said, 25% off. If the discount is less than 10%, I usually just use my free 10% off post office coupon instead.
On top of the discount, if you spend enough money on appliances in a single order, Lowe’s will even mail you a gift card as a thank you. Bundle your appliance purchases together.
I bought a stove, fridge, and dishwasher together. Each was already 15-20% off due to Black Friday. Buying them from Pro Services shaved another 15% off. Finally, I got a $100 rebate gift card because the order was big. The more you spend, the bigger the rebate. On the low end, it’s $50 but it goes as high as $500. Altogether, I saved 35-40% on that order. It adds up.
3. Negotiate at the big box stores. Pro Services isn’t the only way to save money. I recommend also straight up negotiating lower prices.
I was shocked this was even possible. How can the shelf price not be the real price? I stumbled on it by accident.
Very often, you see two prices on the shelf for the same product. One for regular customers, the other for contractors. This got me thinking. Why must I pay the higher price when the store can clearly sell the product profitably at the lower price?
So I asked a sales associate what it would take to get the lower price. “I’m doing a big remodel,” I explained. “I’m going to spend a ton of money on materials. Getting the contractor price would definitely make it easier for me to keep coming back to your store again and again. Any chance you can cut me a break?”
He didn’t say yes right away. But he left an opening by asking questions about my remodel. We went back and forth. I was courteous and pleasant and even a little charming. Turns out, if you’re nice about it, you don’t have to be a contractor to get the contractor price. The nice sales associate rang me up with a nice discount.
For some products, he even gave me a bigger discount than the contractor discount. That taught me the contractor price isn’t even necessarily the lowest price the store can profitably sell at. It also taught me that sales associates have discretion not just on whether to give a discount at all, but to some extent how much discount to give.
Then he said, next time I come back to buy more stuff, just go find him directly and he’d give me at least the contractor discount again. Woot!
I don’t know if this will work at every big box store location. But I have negotiated lower prices, just by asking, at both Lowe’s and Home Depot. At various locations.
It hasn’t worked every time. Sometimes it depends on the sales associate. But it doesn’t hurt to ask. Worst they’ll say is no. They definitely have discretion, that much is clear. The fact that it works for some sales associates means they have some authority to discount.
And if you’re nice about it, you could enjoy significant savings. Spending two minutes to be nice and ask has saved me many hundreds, probably thousands, of dollars across all my visits.
In fact, I recommend going to the Pro Services desk, ask there what the discount would be first, then compare it to the contractor price on the shelf. Since Pro Services vs. contractor prices may be different, negotiate for the lower of the two.
4. Use handymen. This is something I learned on complicated expensive remodels. A good handyman is invaluable because he is, obviously, very handy. He can fix, install, even outright remodel a wide range of things. Sometimes better than contractors themselves.
The main downside of a handyman is they may not know how to do important things like electrical or foundation or framing in the safest way up to code. They also probably aren’t going to know how to navigate the permit process, whereas a general contractor will.
Still, a good handyman knows how to do almost anything not requiring specialized knowledge. Contractors with specialized knowledge will charge much higher prices for straightforward work that a handyman can do for much cheaper. For example, installing a dishwasher, kitchen sink, garbage disposal, toilet, repairing drywall, etc. A handyman may do these for less than half what a contractor charges.
For medium to large remodels, these price differences can really add up. That’s why I use a handyman as much as possible. As long as the job does not require structural/engineering, electrical, advanced carpentry skills, etc, I give all that work to my handyman. Saves a ton of money.
5. Write checks (better yet, use credit cards). When it’s time to pay, I strongly urge paying by credit card. At least by check. Never cash. Always create a paper trail.
Credit cards are best for three reasons. First, you get to float the charge for up to two months before actually having to pay it. Second, credit card companies generally protect cardholders when there is a dispute; as long as you’re not abusing the system, they will often take your word and refund you any disputed money. Third, you earn points with credit cards.
Not all contractors accept credit cards because of the 3% processing fee. Sometimes they will accept cards but make you pay the processing fee. In those cases, at least write a check. That will create a payment record when the check is cashed (in case anyone later disputes whether they were paid).
Never, ever pay cash. If the contractor disappears, it will be difficult to get your money back.
Related: exactly when should you pay your contractor?
Never pay for labor upfront. For large jobs, the contractor may ask for an installment upfront, say, 25-50%. Unless I’ve worked with that contractor before and trust him, I always push back on this.
If they insist on payment upfront, I may agree to pay for materials upfront. But never labor, especially for a new contractor. Not only is there risk they disappear or become unresponsive; I also want to make sure their work is high quality and what we agreed on before paying them.
If I do pay for materials upfront, I’ll ask that my name and address be included on the order/invoice. I will ask for all receipts. And unless too bulky to store, I may even request the materials be delivered directly to my house.
Again, I may flex on these rules if I have worked with the contractor before and trust him. Moreover, progress payments for labor may reasonably be required at checkpoints along the way, particularly for large remodels. But I make sure any progress payments are tied to completing key milestones, not simply because the contractor “hasn’t been paid in a while.” A key milestone could be passing a permit inspection. Either way, I only pay for labor (which is the majority cost) after it’s done. For short projects, e.g., one week or less, payment for the entire project usually comes at the end.
6. Get receipts…and lien waivers. Every time you make a payment, get a written receipt. Preferably both signed hard copy and emailed. You’ll need it for tax purposes anyway. But it’s also proof the contractor was paid.
Very important: if the contractor uses subcontractors, then absolutely insist on getting signed lien waivers from all subcontractors and the general contractor in exchange for payment to the general contractor.
The general contractor is supposed to pay his subcontractors. Usually they do. But there are some bad apples who won’t hesitate to take a big payment and then disappear.
Guess what? If you don’t have signed lien waivers, those subcontractors can still come after you for payment. Even though you paid the GC and can prove it (i.e., can show check was cashed), the sub can still lien your house to force payment.
This is called a “mechanic’s lien.” It gets super priority over other payment creditors. It’s not fair, but you could end up having to pay twice.
Therefore, even if a contractor who uses subs complains and pushes back, or promises that his subs never enforce liens, ALWAYS insist on getting signed lien waivers from all subs AND the GC before paying the GC. The more at stake, the more important this is.
Note: this isn’t a problem when the workers are employees of the contractor. You have no payment liability to a contractor’s employees. It’s only when the contractor subs out work to other independent contractors that you may be liable for double payment, i.e., if they did work but never actually got paid by the GC.
7. Take lots of photos and video right after the remodel. Right after the remodel, I recommend taking tons of photos and video. Use these when listing your rental online. Video walk-throughs particularly help enhance your listing.
The unit will never again look as fresh and new as it does right after a remodel, which is why I recommend taking photos and video right away. You’ll thank yourself later because you can use those photos and videos over and over every time you need to list the unit to find new tenants.
8. Advertise your listing at the right time to get a tax break. Start advertising your listing even before it’s 100% ready to rent. By doing so, you can expense more remodeling costs than if you wait until the remodel is complete to start advertising.
The rule is, you cannot expense remodel costs until the property is put “into service.” Otherwise, you must capitalize and depreciate costs over 27.5 years.
Depreciation is worse than expensing because it takes longer and you also have to pay depreciation recapture tax up to 25% when you sell.
What does it mean to put the property “into service”? According to the IRS, it means when the property is ready and available for rent. To be “available,” you have to actually advertise the unit.
But you can’t just go willy nilly and advertise before you even begin remodeling, thinking you’re going to expense it all. Doesn’t work like that. The unit also has to be “ready.” That means it must be “substantially complete” before you advertise it.
What qualifies under this definition is pretty flexible to the IRS. You can typically advertise before incurring major expenses like painting, stainless steel appliances, granite countertops, fancy lights and fixtures.
Once the property is in service, costs incurred are operating costs, which can be expensed. Costs before that point must be capitalized (you want to minimize those).
Another caveat: there are dollar limits. If the item is more than $2,500 you’ll have to capitalize and depreciate it. No expensing for roof replacements.
Think about how you can plan your invoices to fly under this dollar limit. Don’t let your contractor write a single invoice that rolls up all costs into one big number. Get several itemized invoices: one for materials, one for deposit, one for progress payment, etc.
Conclusion
There you have it – the lessons we learned to remodel efficiently and effectively.
Next, our last post of this series: How to find great tenants for your rental property in 4 simple steps that take 1 hour or less.
You’ve done all the hard work – now getting great tenants in to help you build real estate wealth is what it’s all about, what you’ve worked SO hard for. Don’t miss my tips for acing this last step!
Check out all the posts in this series:
- House Hacking San Francisco Bay Area style (how we’re creating real estate wealth by having others pay our mortgage on a multi-million dollar house)
- How to research real estate markets (the single best resource you need)
- How to do a residential property inspection step by step (what smart real estate investors look for)
- How to write an offer to purchase a house (that stands out and wins)
- How to minimize rental vacancy before you close on a new rental property purchase
- How to find and vet good contractors like a boss (for home remodeling and repairs)
- You are here: Battle-tested home remodeling tips for saving serious money and getting the most from your contractors
- How to find great tenants for your rental property in 4 simple steps that take 1 hour or less
Plus: make sure you think about your real estate tax strategy from the very beginning. Check out my post on how to avoid capital gains taxes when selling your house to get up to speed.
Also: learn from some of the best real estate investors in the business from our post: 18 real estate investors share what they wish they knew at college graduation.
Discussion: What tips and strategies have you found for remodeling effectively? Any painful lessons learned? What would you do differently knowing what you know now? Leave a comment below!

Leave a Reply